> ## Documentation Index
> Fetch the complete documentation index at: https://resend.com/docs/llms.txt
> Use this file to discover all available pages before exploring further.
# Cloudflare
> Verify your domain on Cloudflare with Resend.
## Add Domain to Resend
First, log in to your [Resend Account](https://resend.com/login) and [add a domain](https://resend.com/domains).
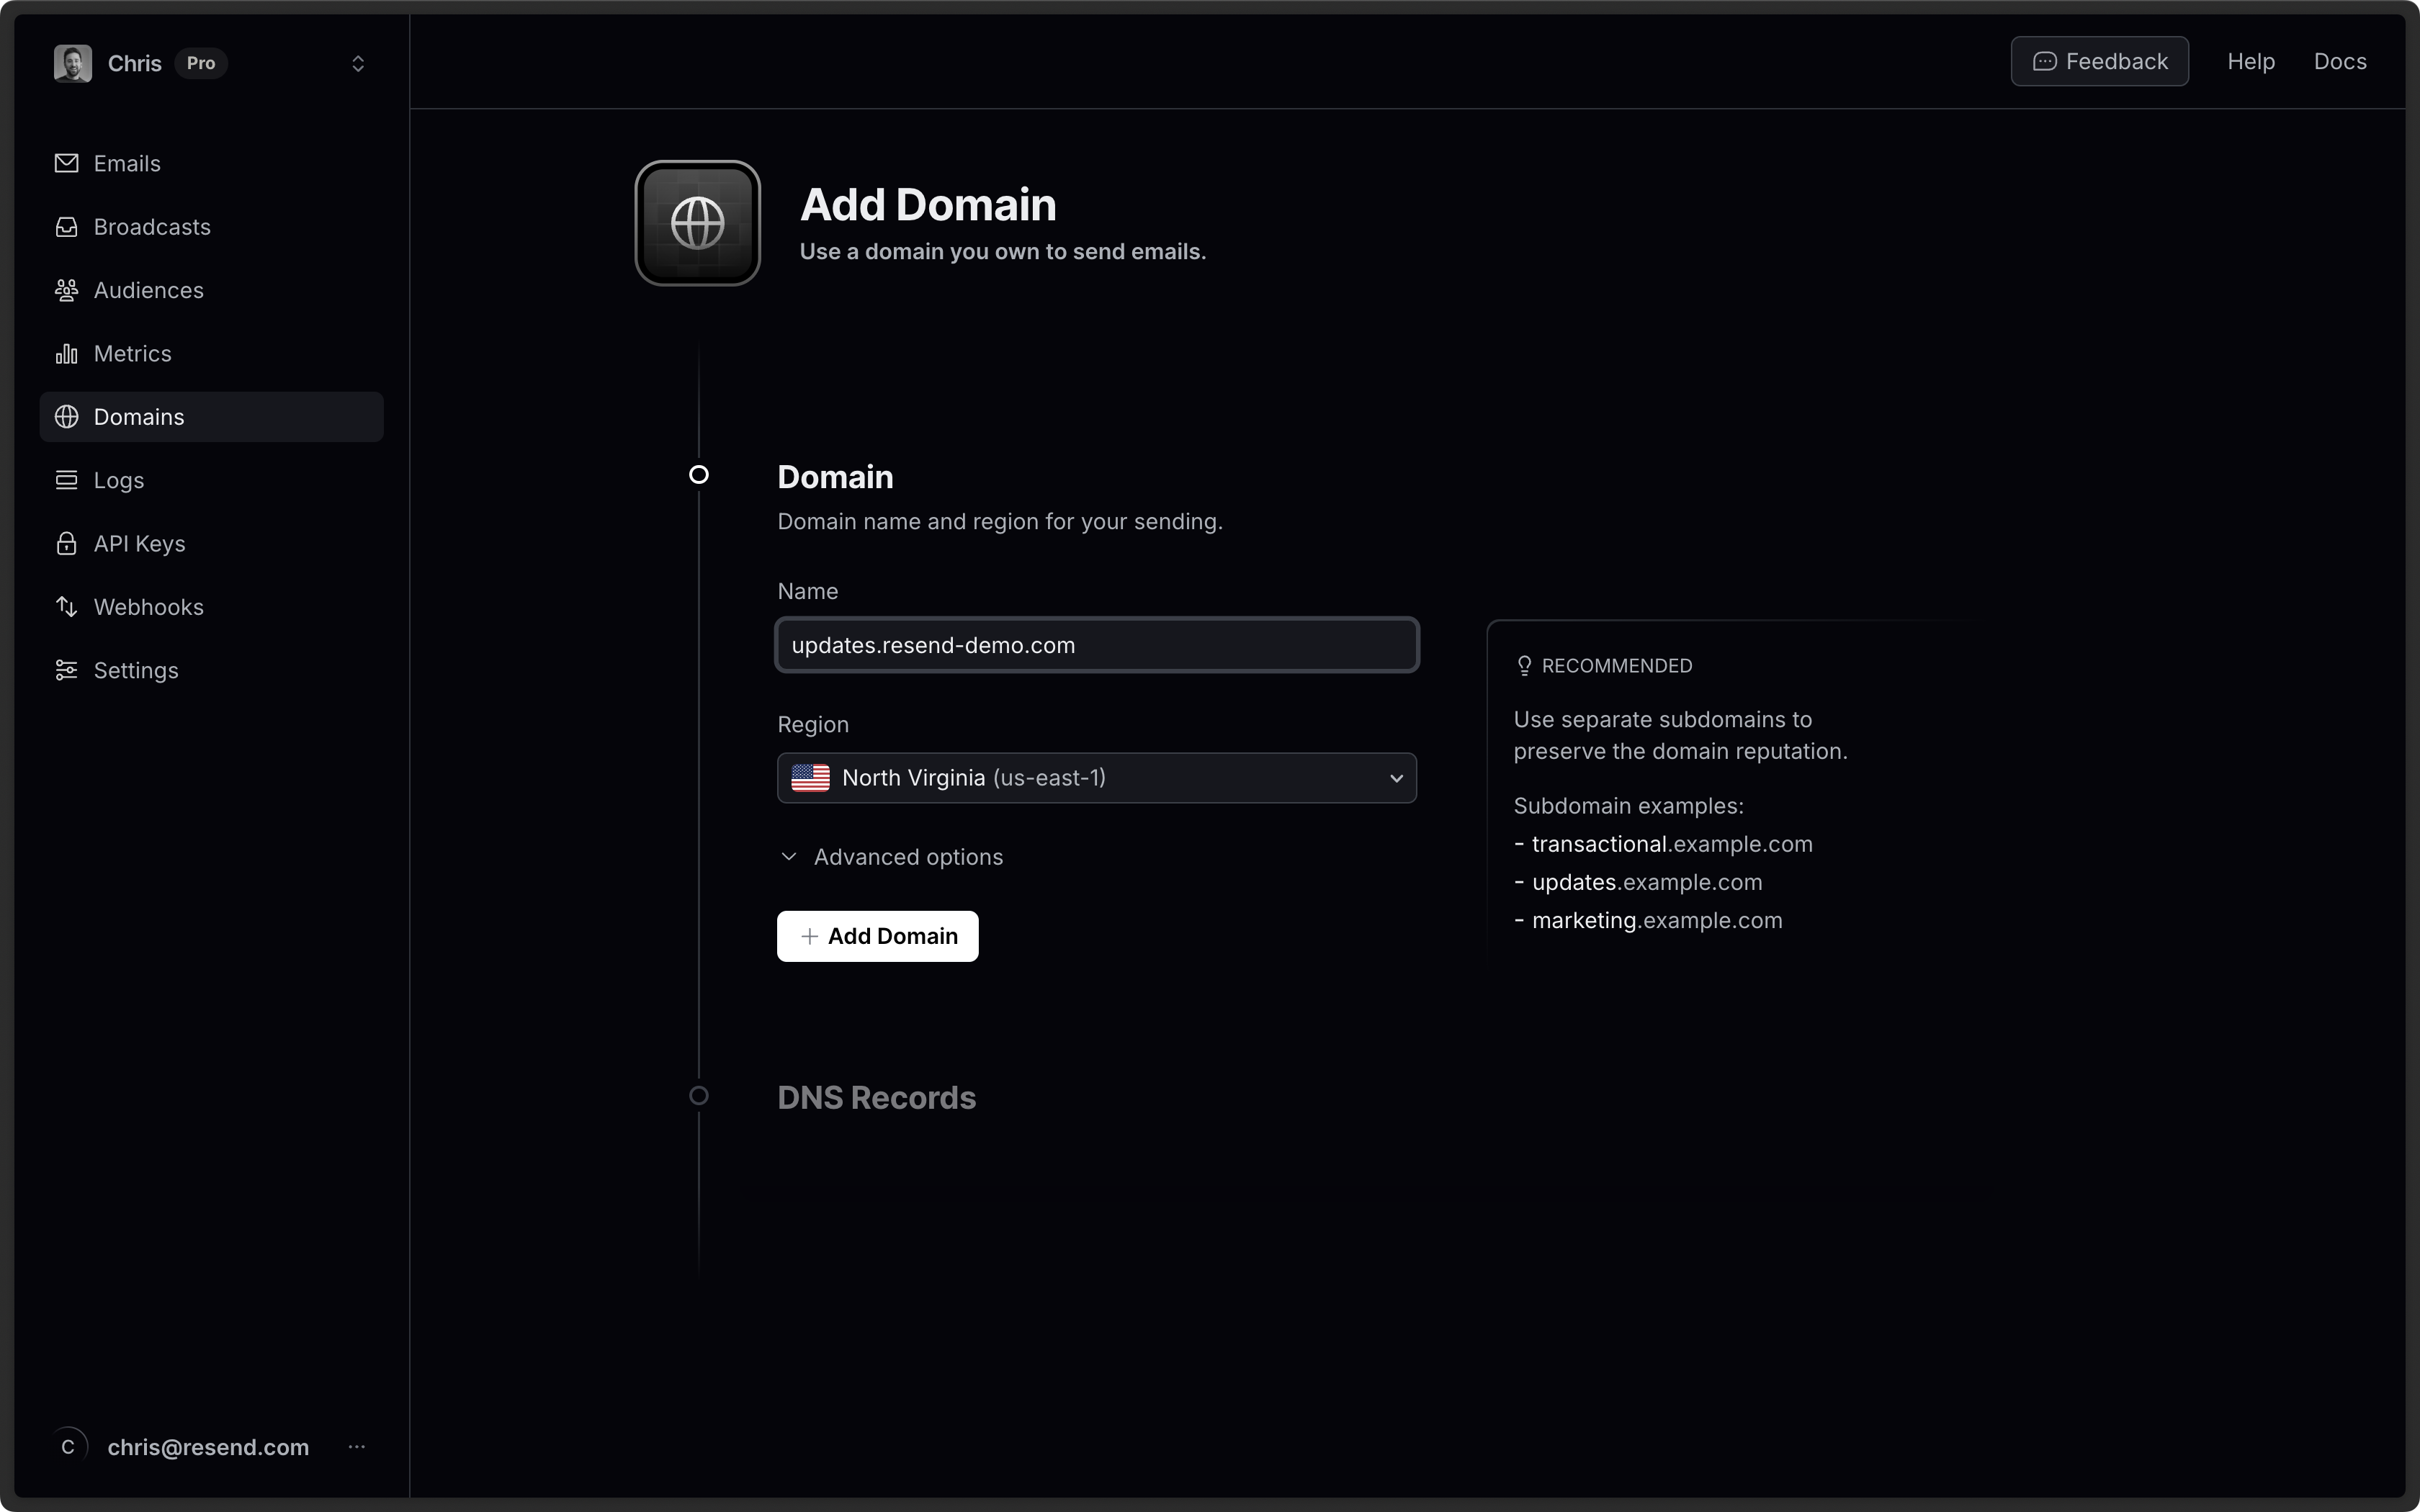 It is [best practice to use a
subdomain](/knowledge-base/is-it-better-to-send-emails-from-a-subdomain-or-the-root-domain)
(updates.example.com) instead of the root domain (example.com). Using a
subdomain allows for proper reputation segmentation based on topics or purpose
(e.g. marketing) and is especially important if receiving emails with Resend.
## Automatic Setup (Recommended)
The fastest way to verify your domain on Cloudflare is using the **Sign in to Cloudflare** button on Resend. This uses Domain Connect to automatically configure your DNS records.
1. Go to your [Domains page](https://resend.com/domains) in Resend.
2. (Optional) If you want to receive emails, select `Manual setup` and toggle the "Receiving" switch on the domain details page. ([Learn more below](#receiving-emails))
3. Click **Sign in to Cloudflare** button.
4. Authorize Resend to access your Cloudflare DNS settings.
5. The DNS records will be added automatically.
That's it. Your domain will be verified within a few minutes.
## Manual Setup
If you prefer to add DNS records manually, follow these steps.
### Log in to Cloudflare
Log in to your [Cloudflare account](https://cloudflare.com) and go to the DNS Records of your domain.
It is [best practice to use a
subdomain](/knowledge-base/is-it-better-to-send-emails-from-a-subdomain-or-the-root-domain)
(updates.example.com) instead of the root domain (example.com). Using a
subdomain allows for proper reputation segmentation based on topics or purpose
(e.g. marketing) and is especially important if receiving emails with Resend.
## Automatic Setup (Recommended)
The fastest way to verify your domain on Cloudflare is using the **Sign in to Cloudflare** button on Resend. This uses Domain Connect to automatically configure your DNS records.
1. Go to your [Domains page](https://resend.com/domains) in Resend.
2. (Optional) If you want to receive emails, select `Manual setup` and toggle the "Receiving" switch on the domain details page. ([Learn more below](#receiving-emails))
3. Click **Sign in to Cloudflare** button.
4. Authorize Resend to access your Cloudflare DNS settings.
5. The DNS records will be added automatically.
That's it. Your domain will be verified within a few minutes.
## Manual Setup
If you prefer to add DNS records manually, follow these steps.
### Log in to Cloudflare
Log in to your [Cloudflare account](https://cloudflare.com) and go to the DNS Records of your domain.
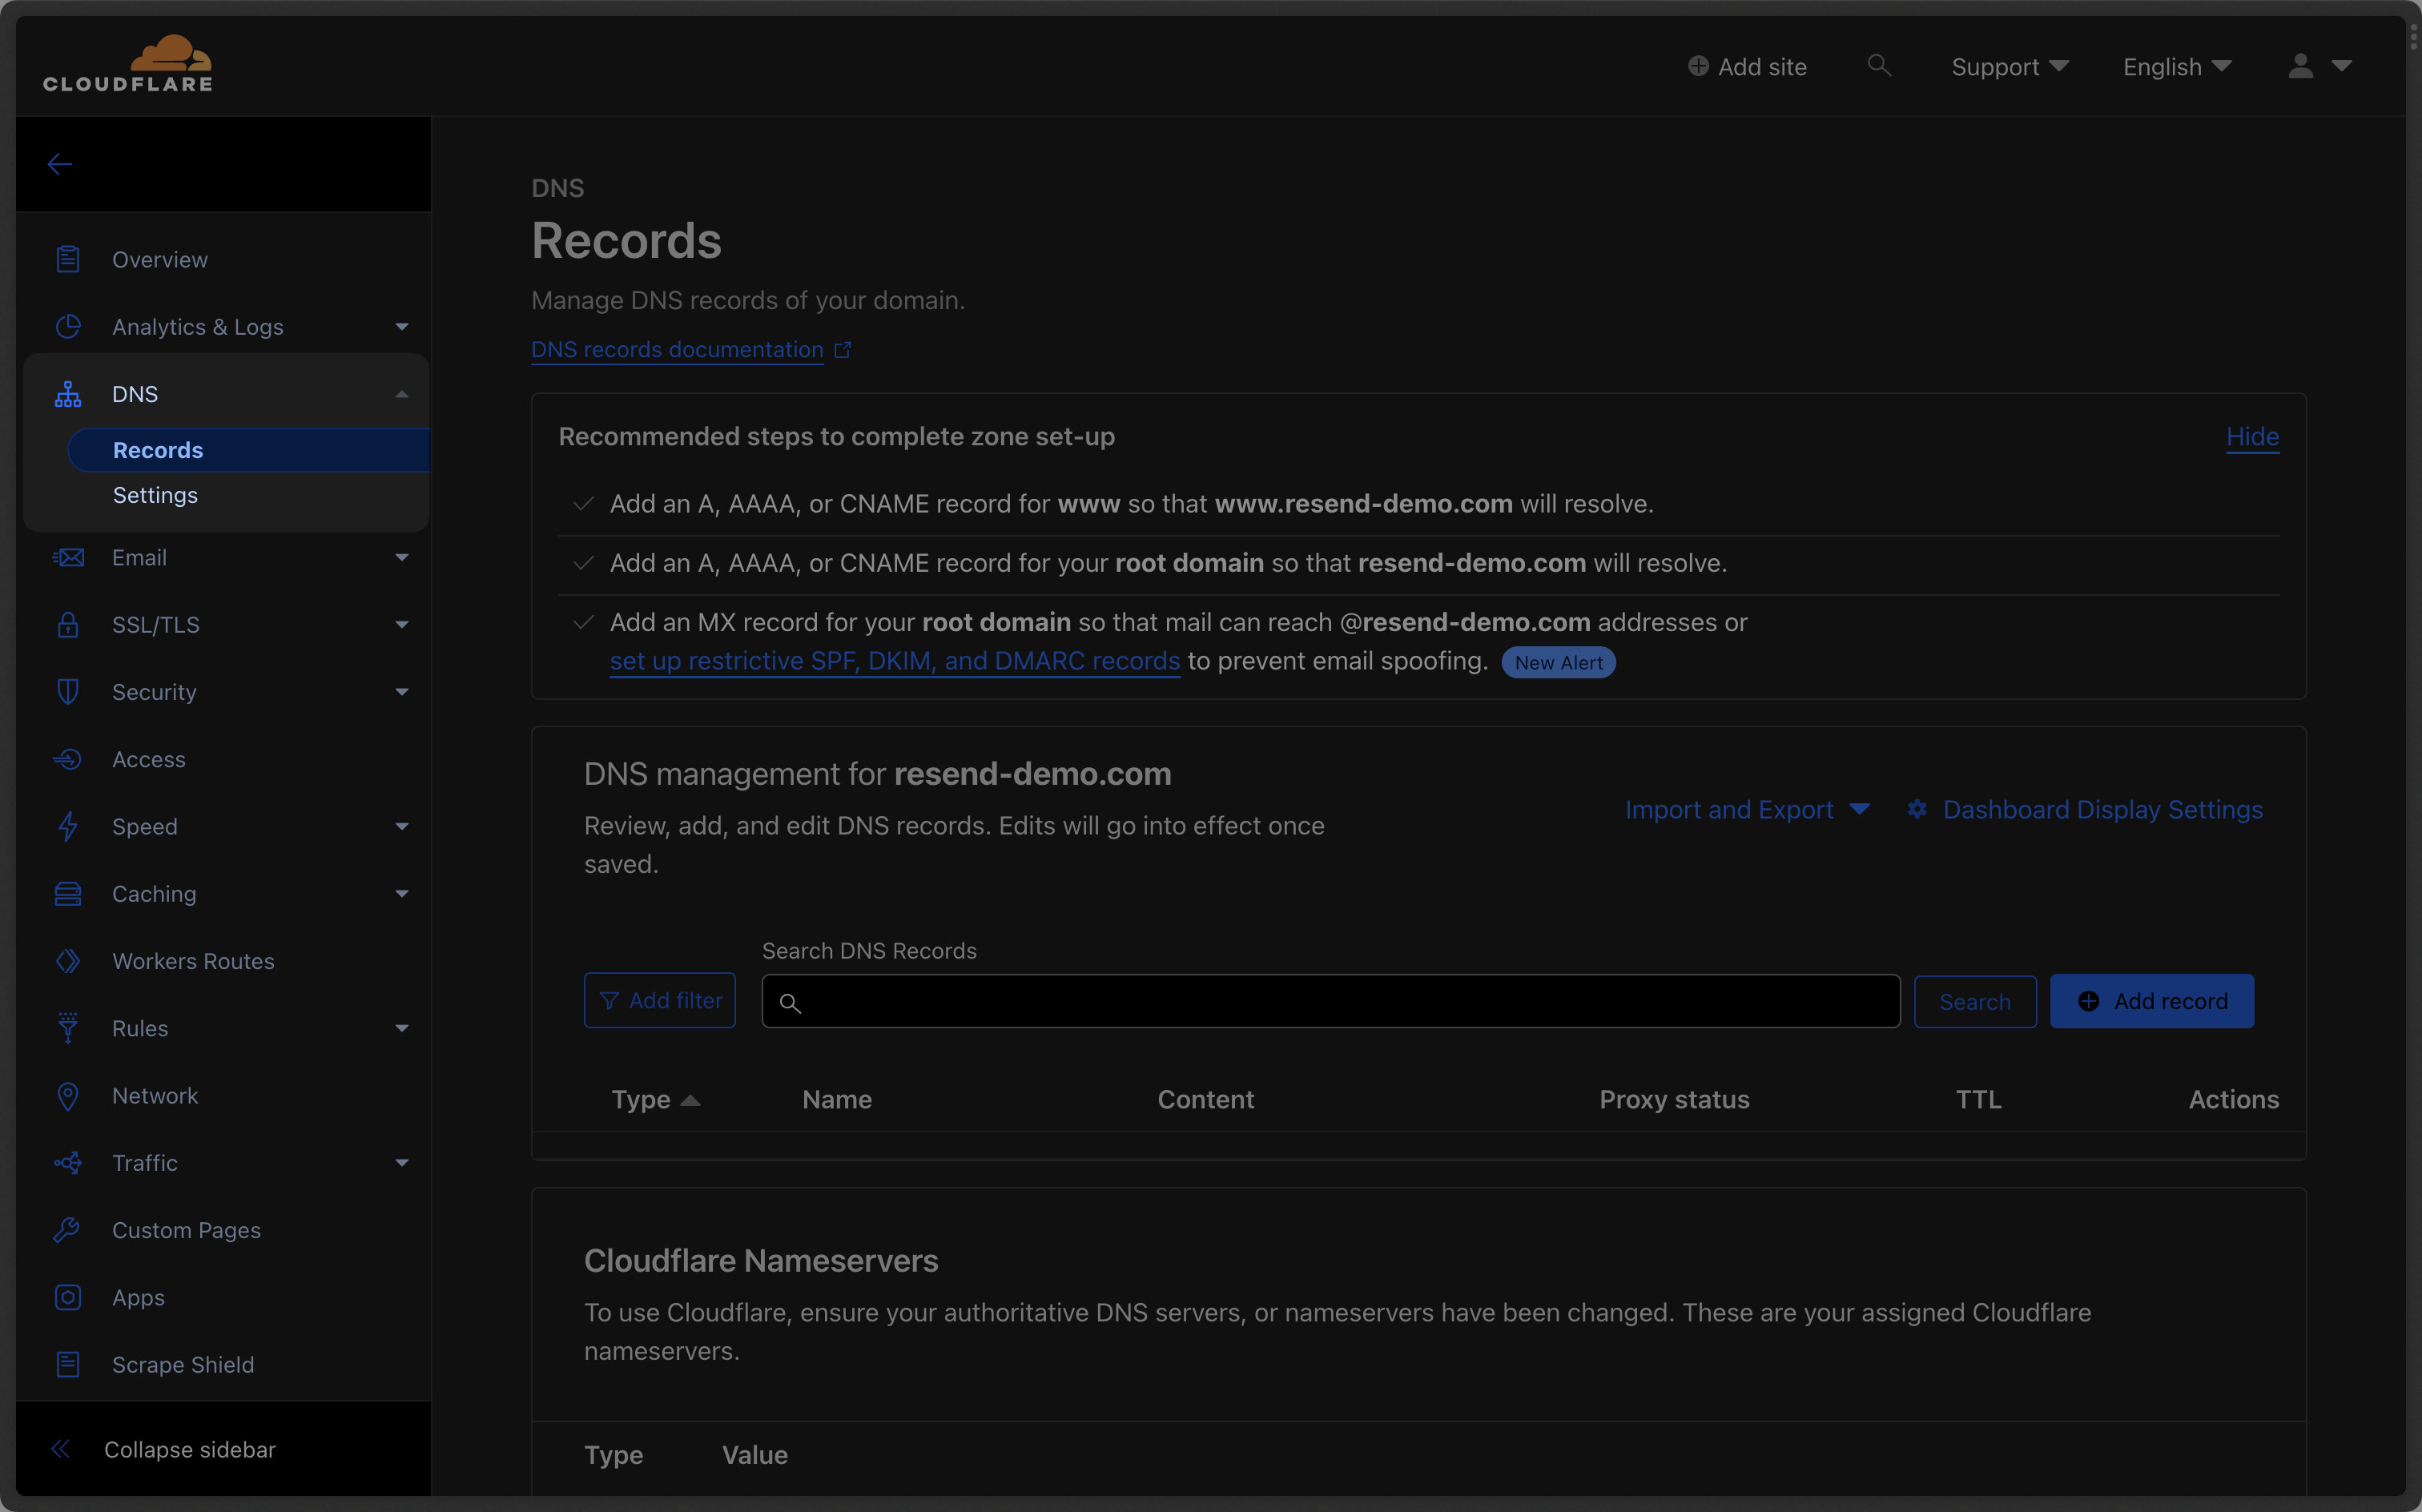 ### Add MX SPF Record
Click "Add Record" on Cloudflare:
1. Set the Type to `MX`.
2. Type `send` for the `Name` of the record.
3. Copy the MX Value from Resend into the `Mail Server` field.
4. Use the default `Auto` for `TTL`.
5. Add `10` for the `Priority`.
6. Select `Save`.
### Add MX SPF Record
Click "Add Record" on Cloudflare:
1. Set the Type to `MX`.
2. Type `send` for the `Name` of the record.
3. Copy the MX Value from Resend into the `Mail Server` field.
4. Use the default `Auto` for `TTL`.
5. Add `10` for the `Priority`.
6. Select `Save`.
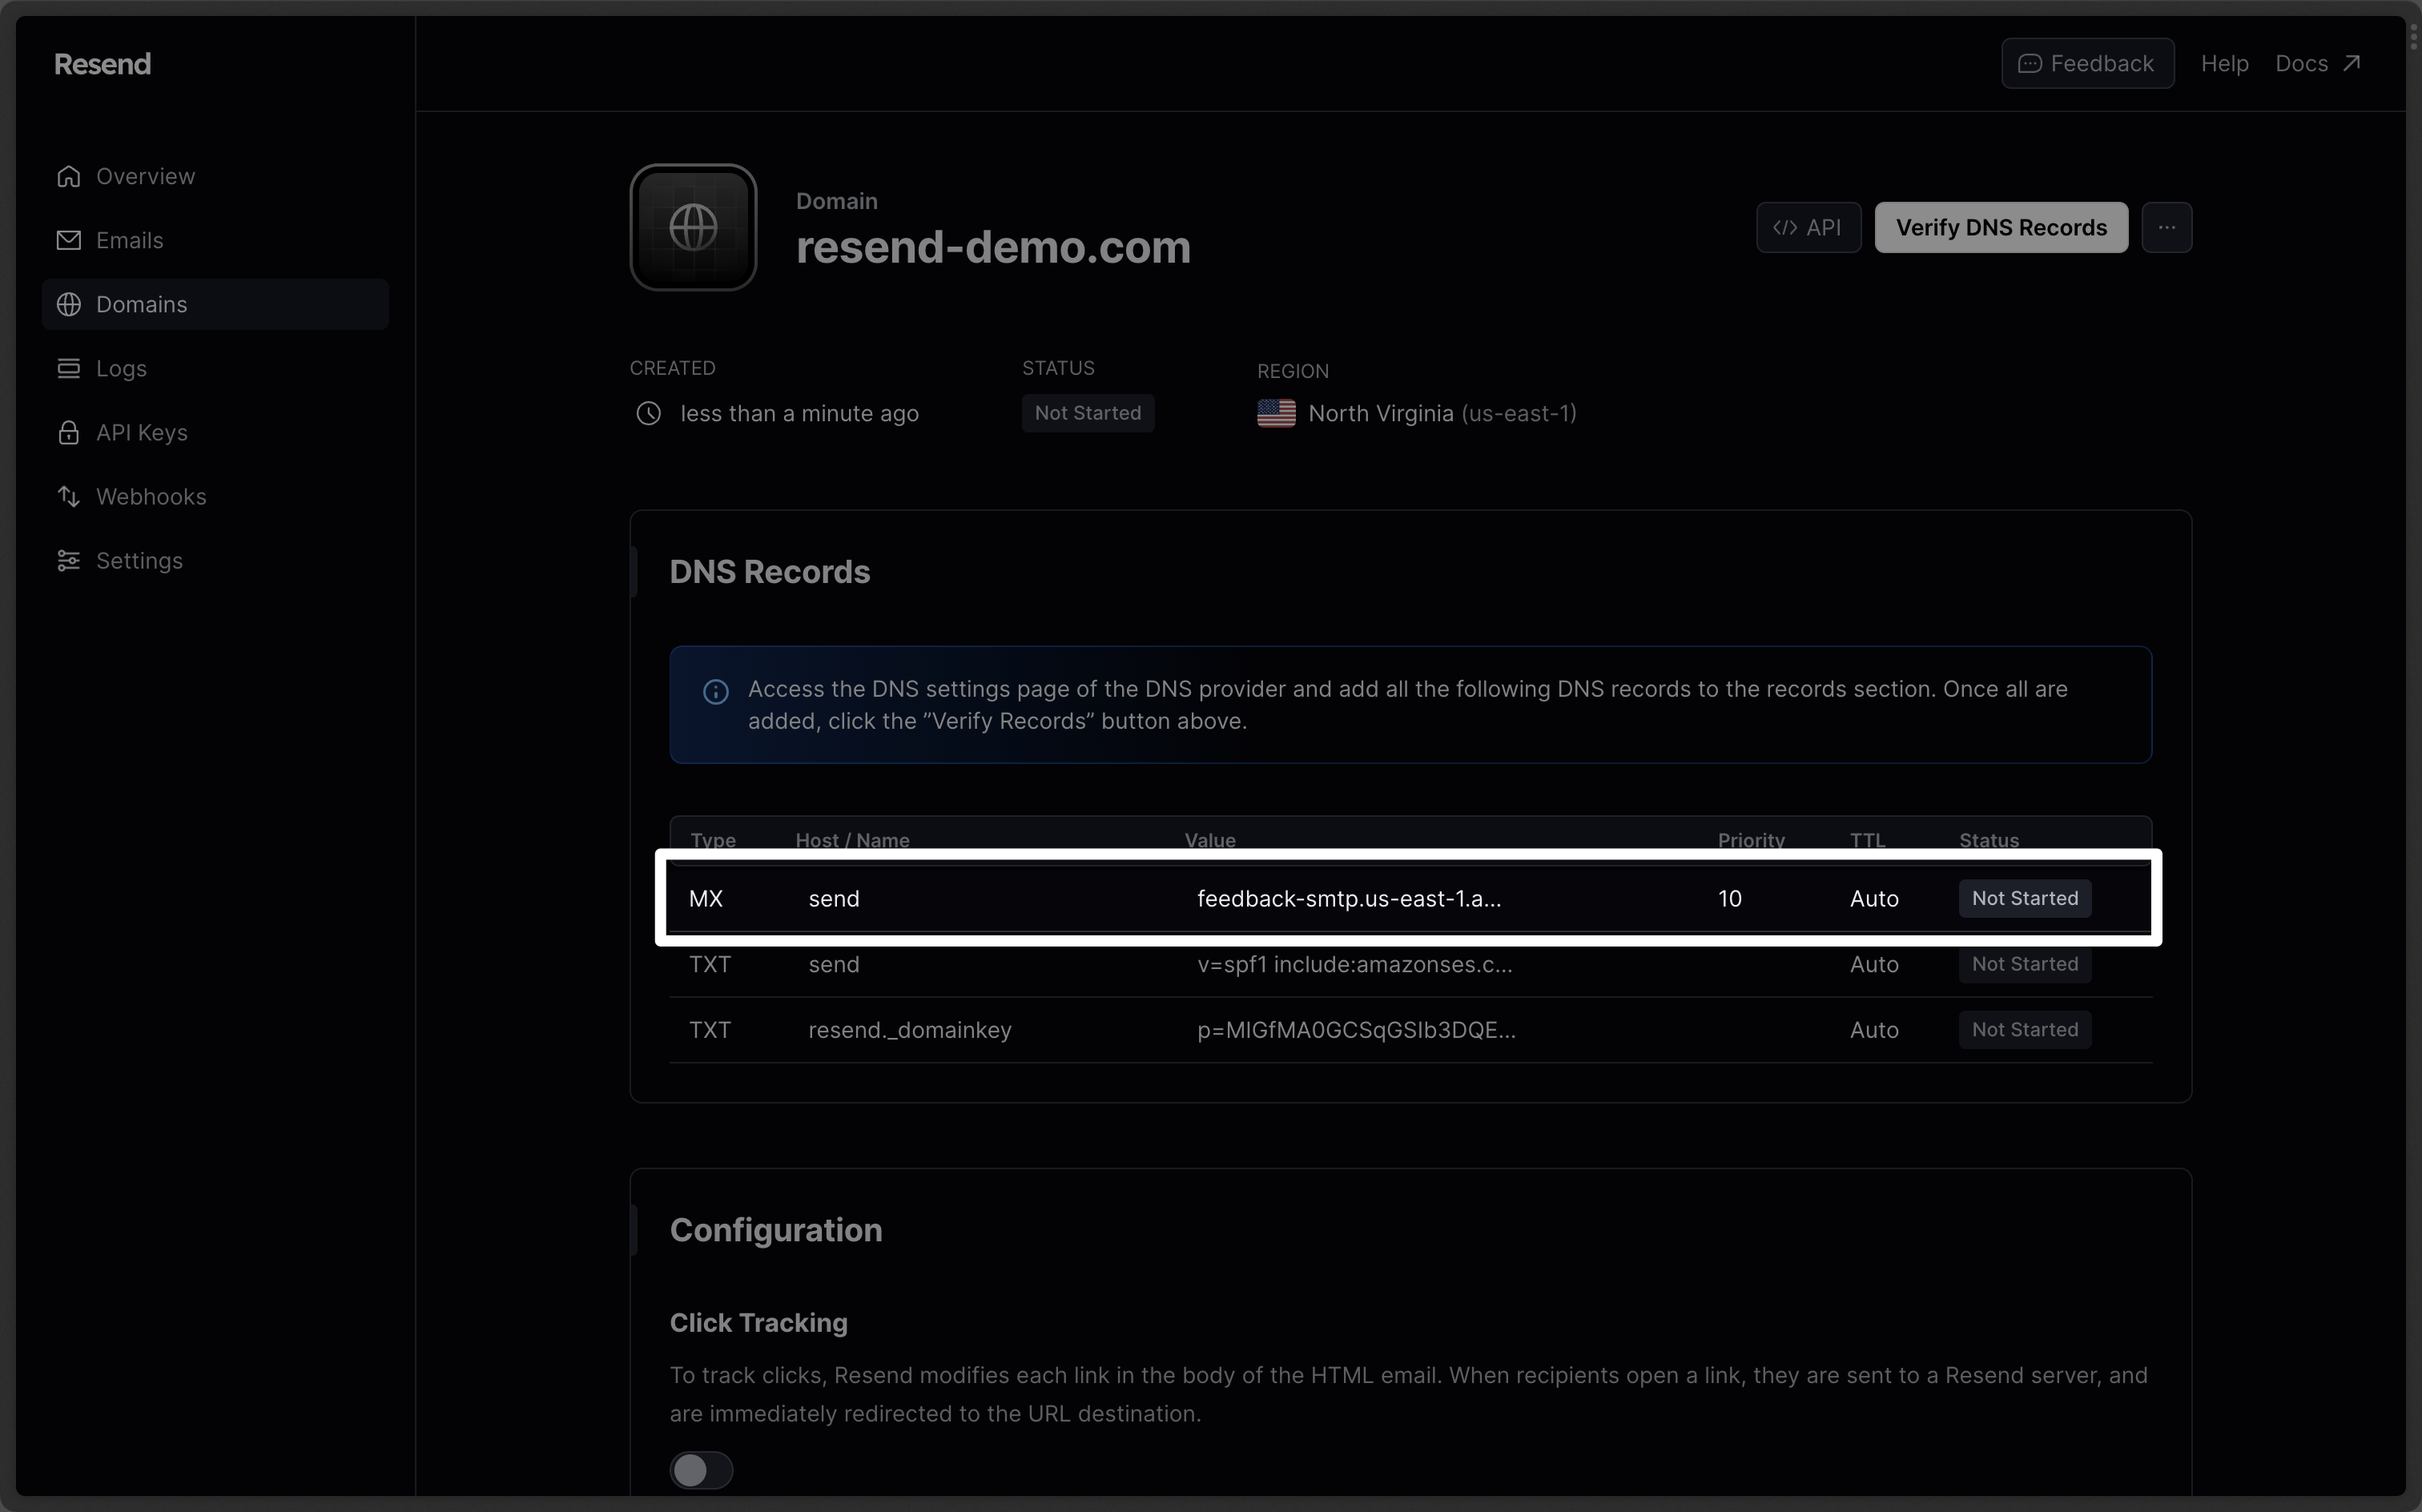
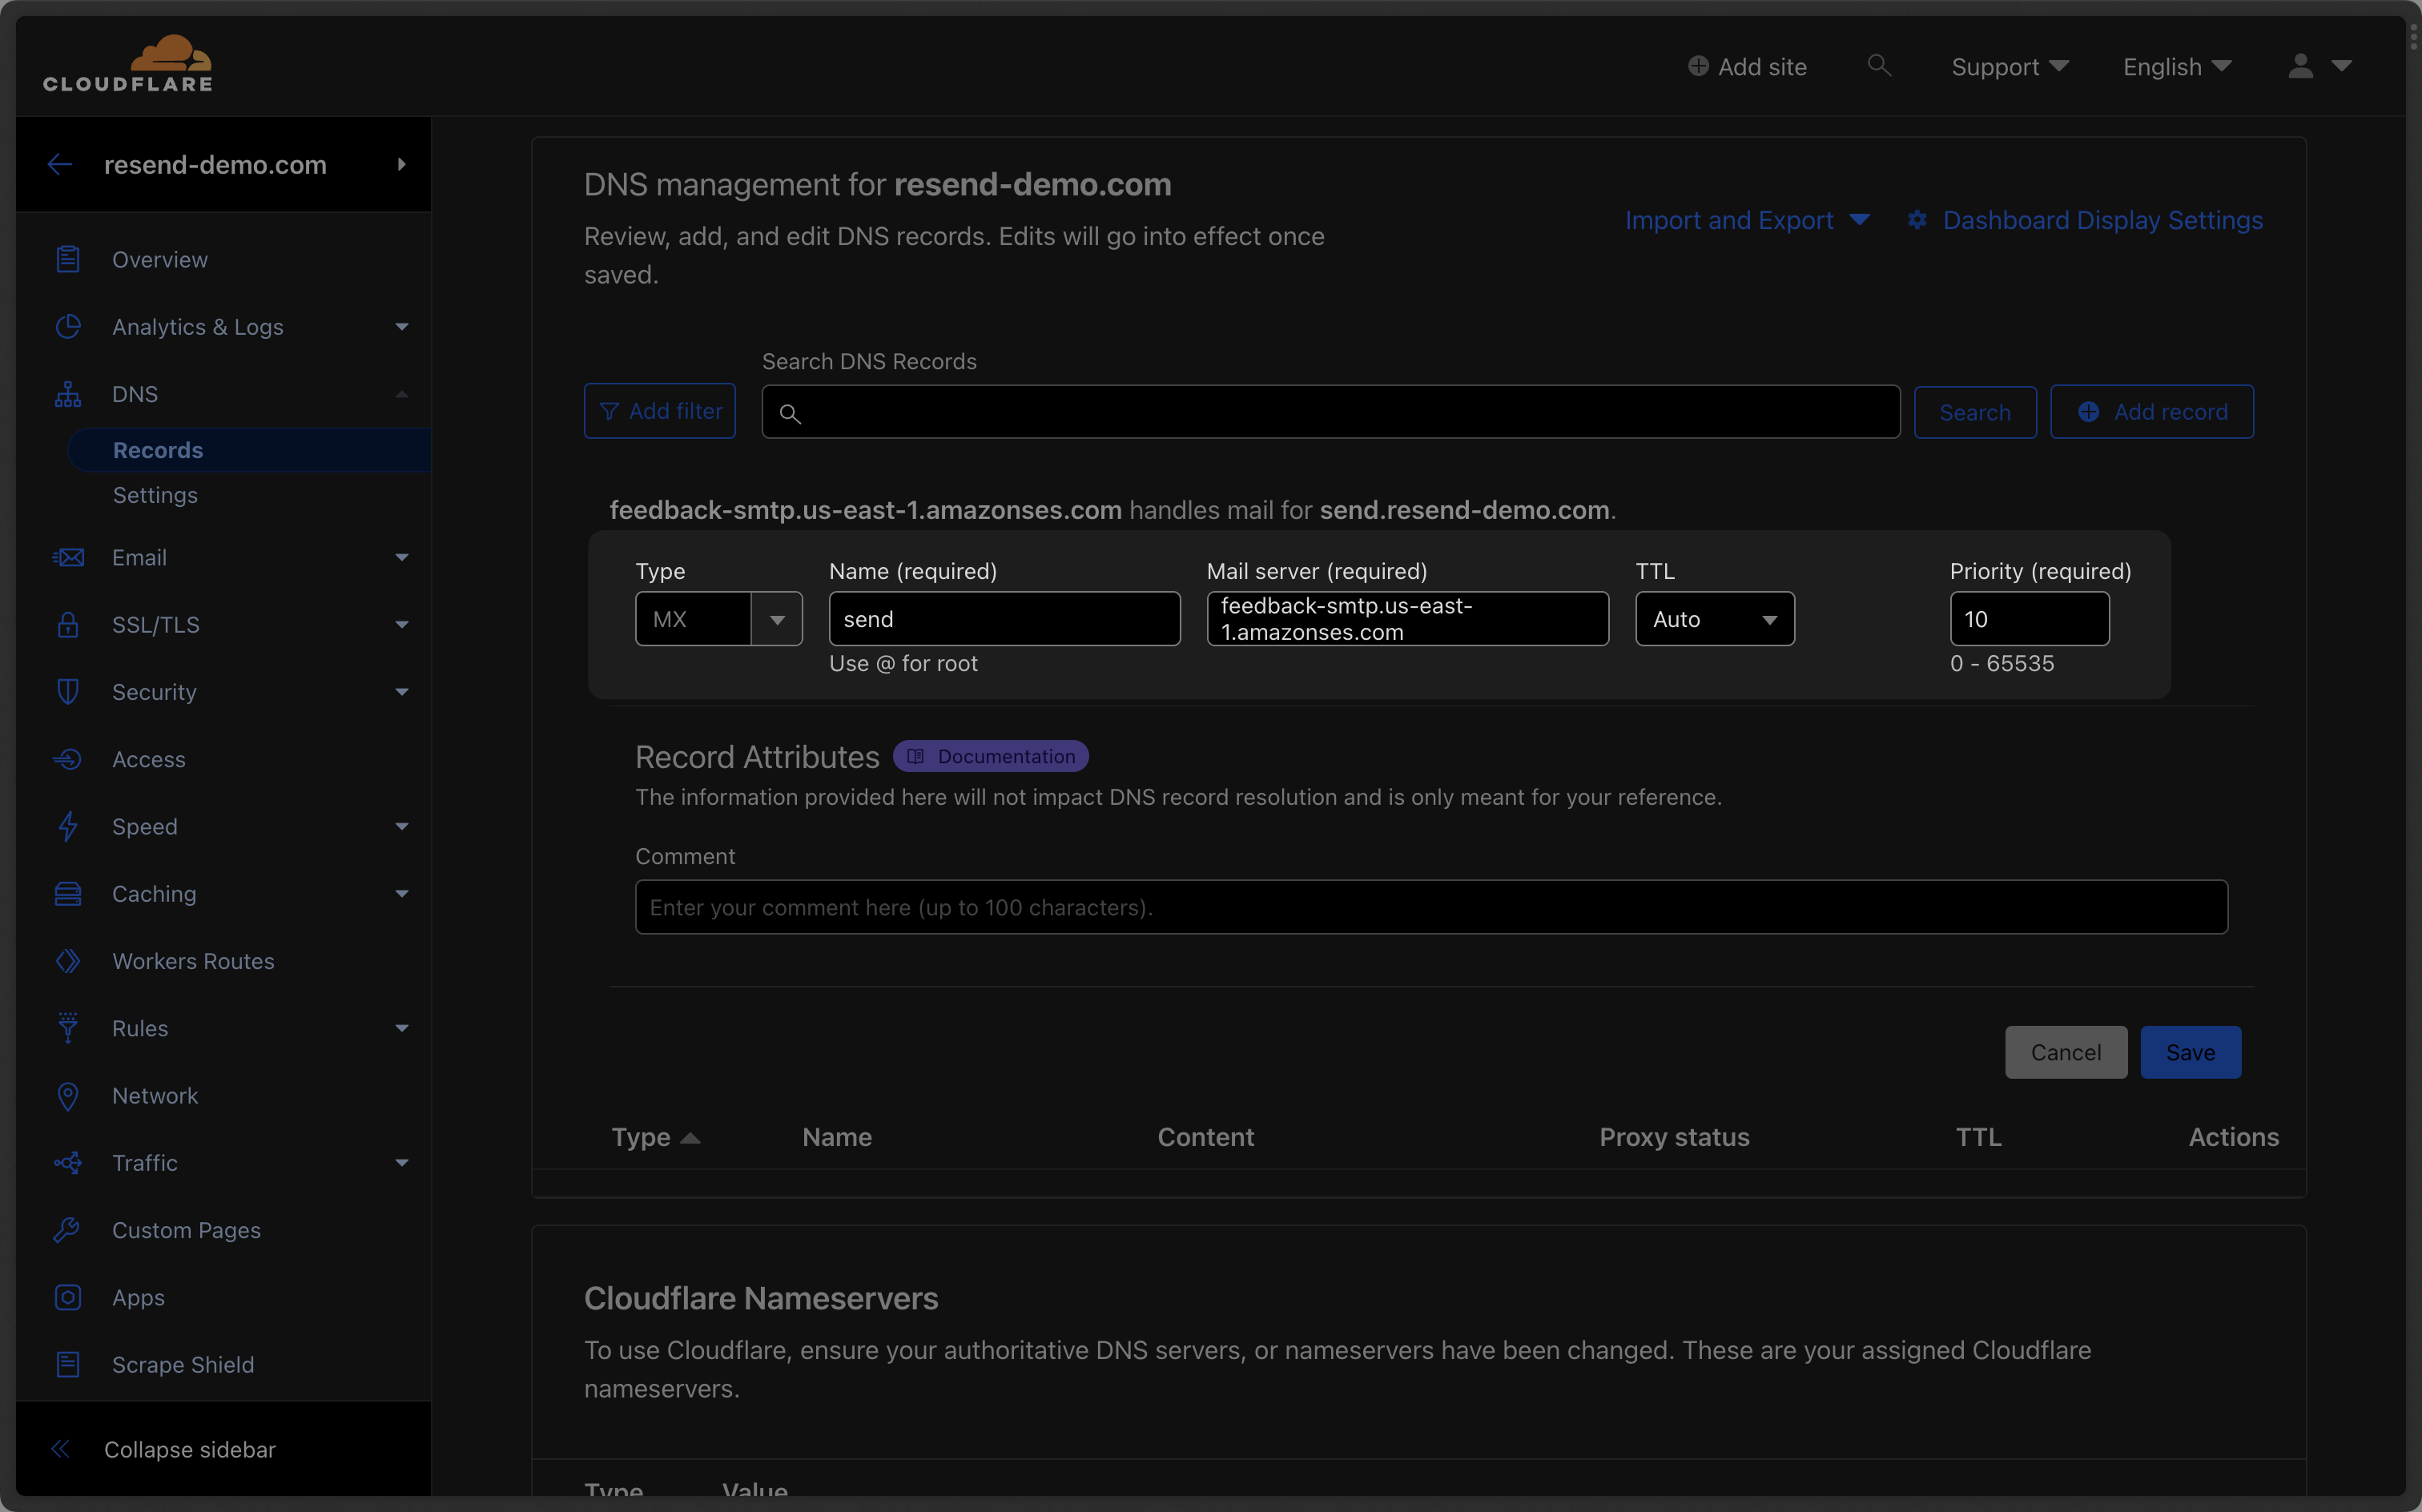 Below is a mapping of the record fields from Resend to Cloudflare:
| Cloudflare | Resend | Example Value |
| ----------- | -------- | --------------------------------------- |
| Type | Type | `MX` |
| Name | Name | `send` |
| Mail Server | Content | `feedback-smtp.us-east-1.amazonses.com` |
| Priority | Priority | `10` |
Omit your domain from the record values in Resend when you paste. Instead of
`send.example.com`, paste only `send` (or `send.subdomain` if you're using a
subdomain).
Do not use the same priority for multiple records. If Priority `10` is already
in use, try a higher value `20` or `30`.
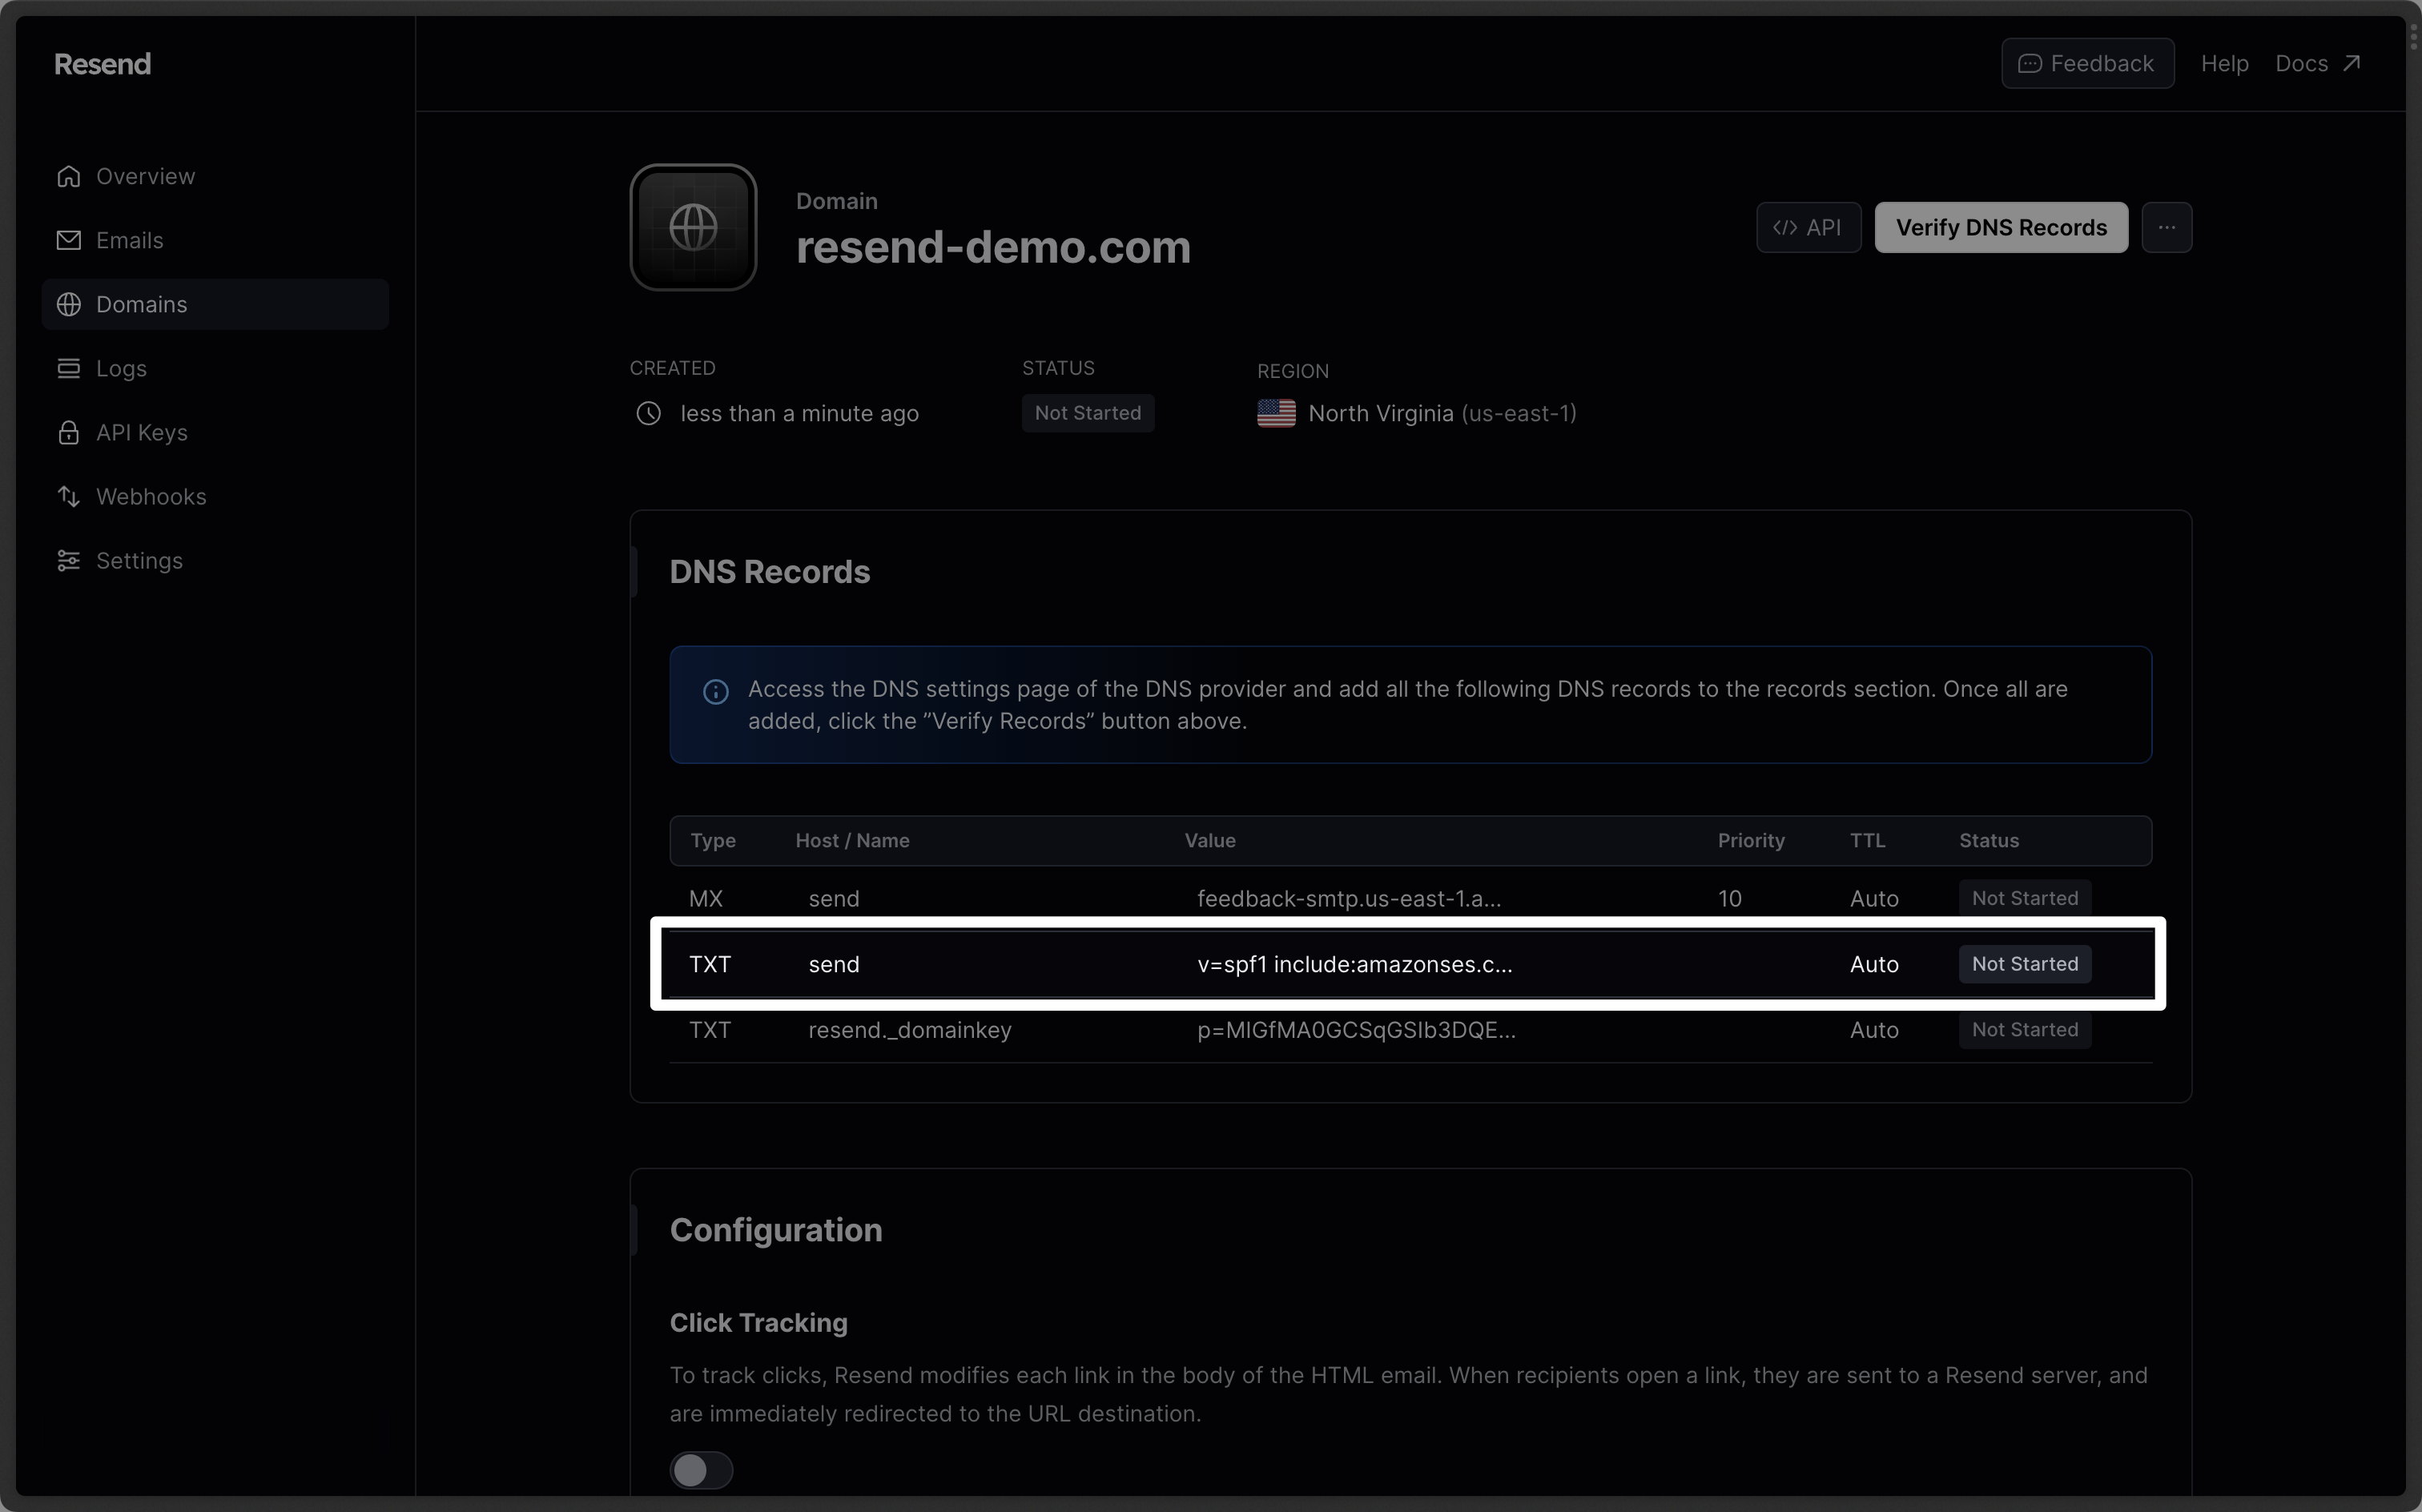
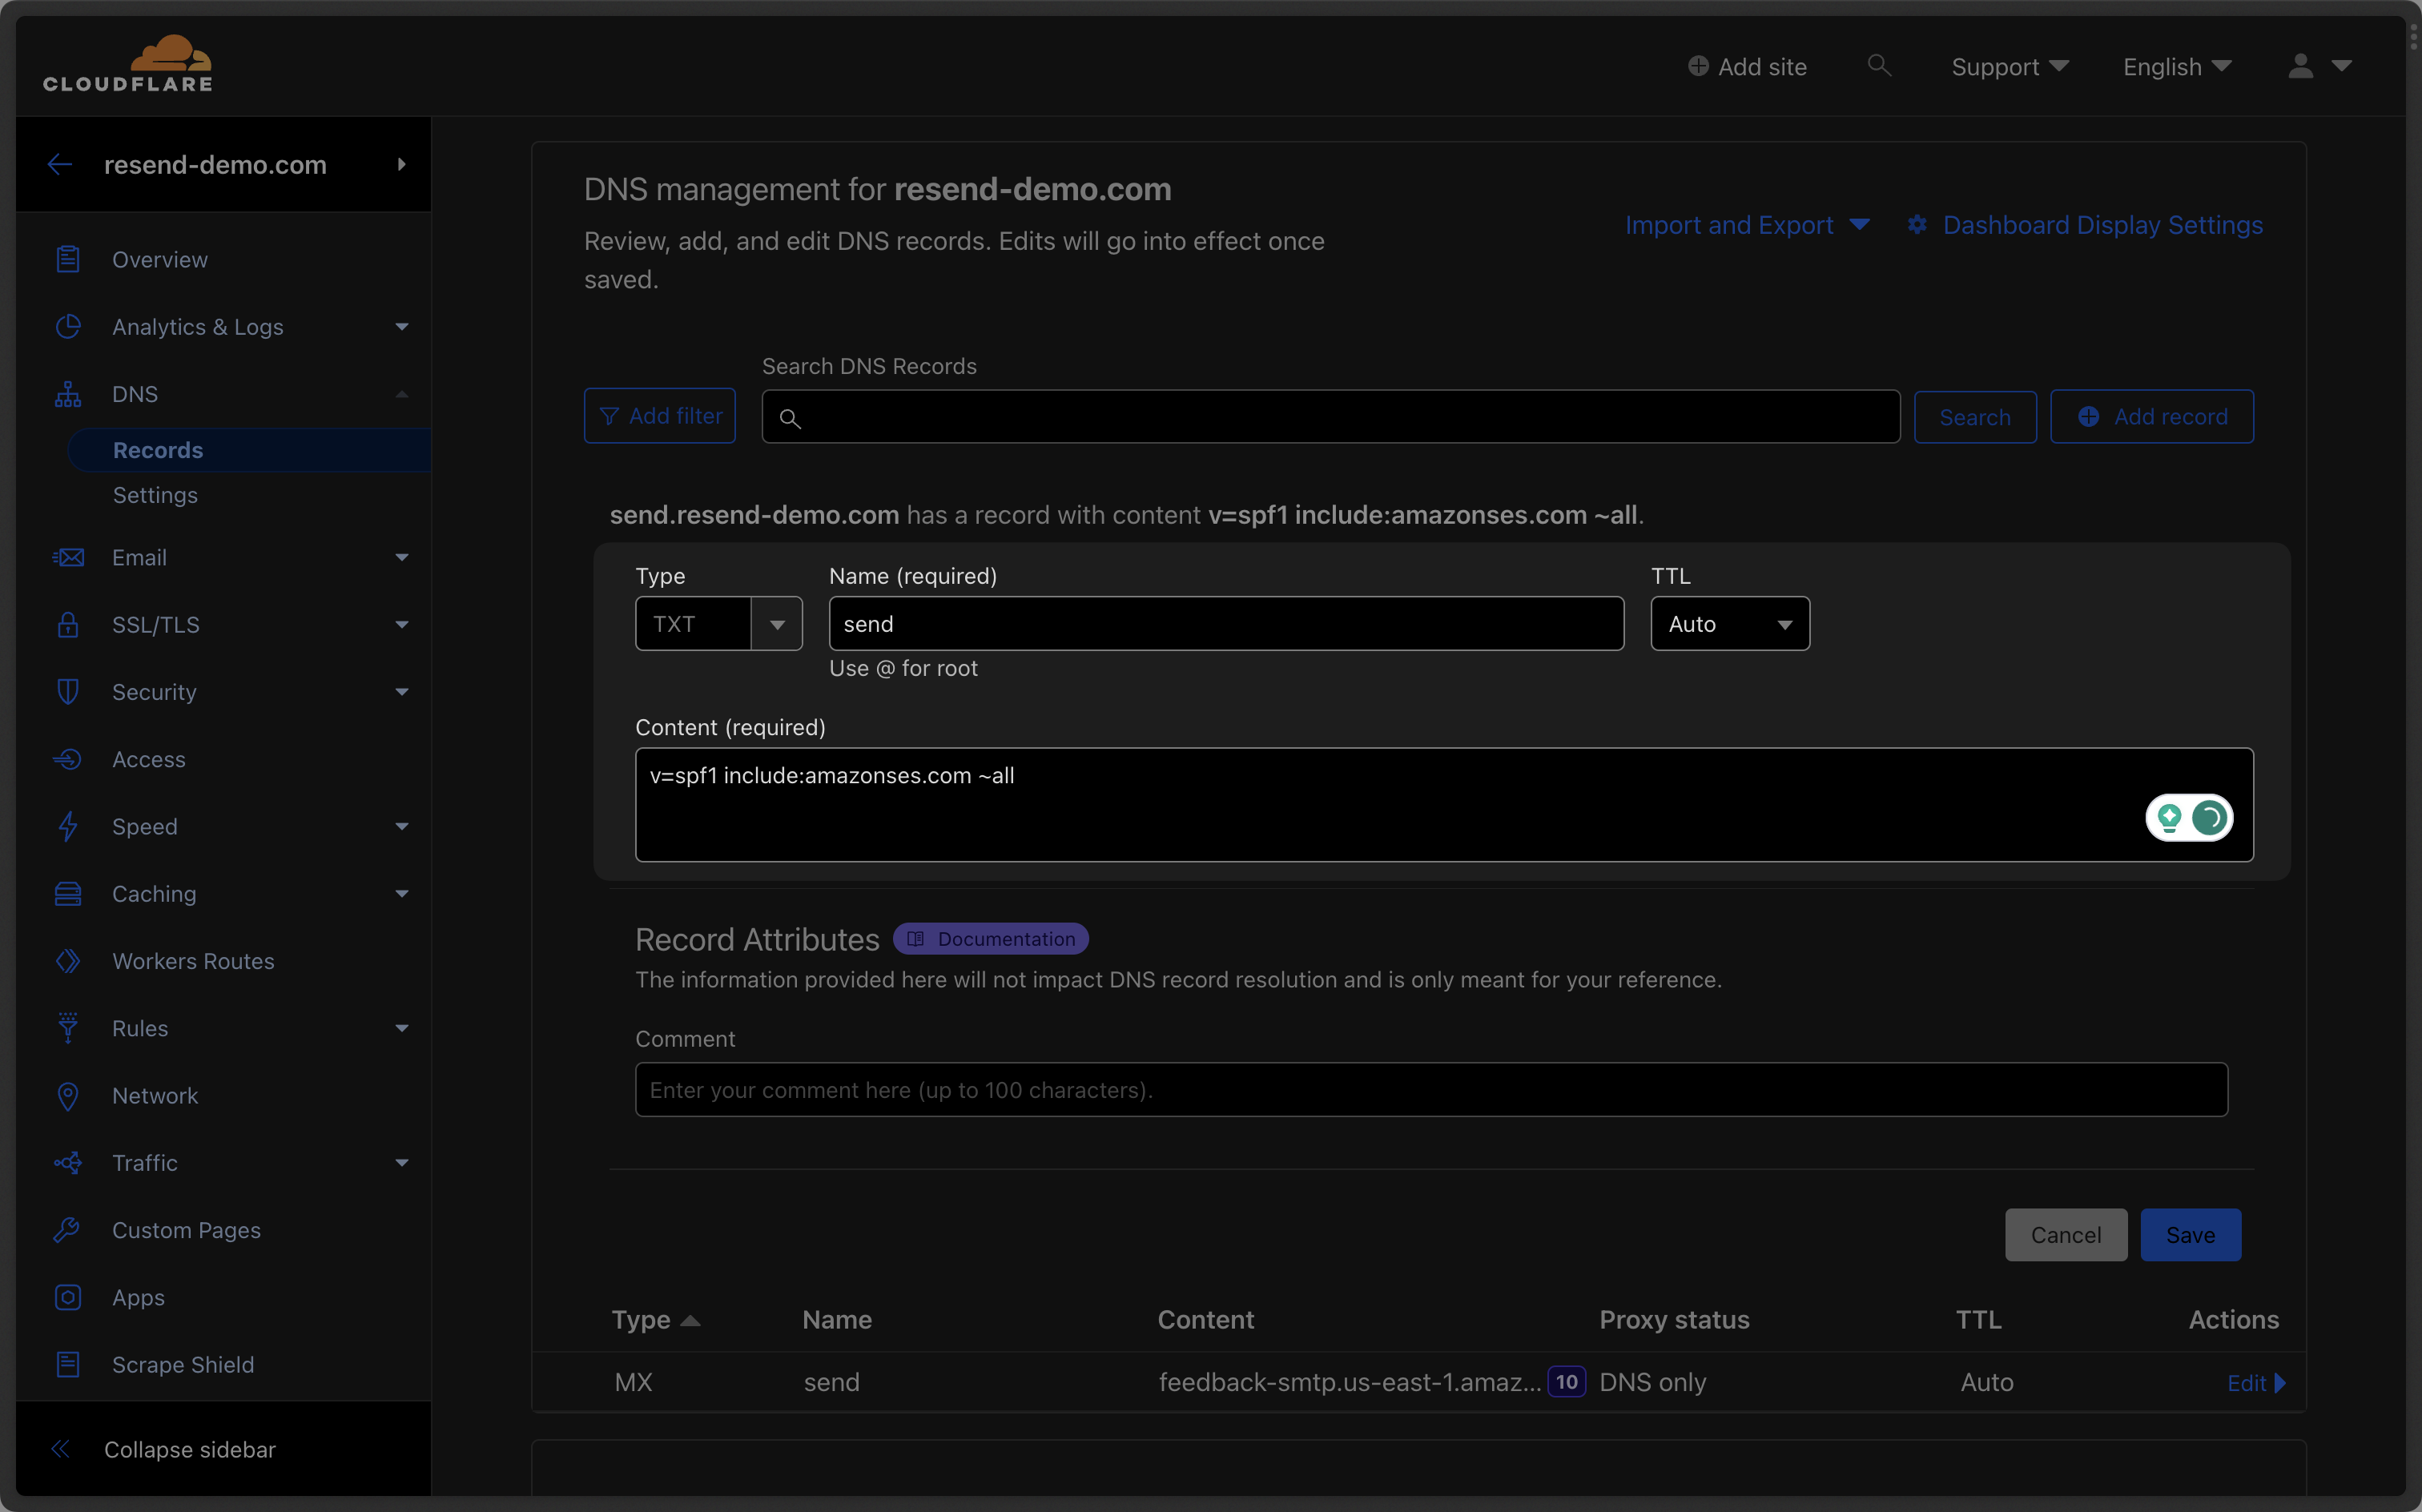
### Add TXT SPF Record
Click "Add Record" on Cloudflare:
1. Set the Type to `TXT`.
2. Type `send` for the `Name` of the record.
3. Copy the TXT Value Resend into `Content` field.
4. Use the default `Auto` for `TTL`.
5. Select `Save`.
Below is a mapping of the record fields from Resend to Cloudflare:
| Cloudflare | Resend | Example Value |
| ----------- | -------- | --------------------------------------- |
| Type | Type | `MX` |
| Name | Name | `send` |
| Mail Server | Content | `feedback-smtp.us-east-1.amazonses.com` |
| Priority | Priority | `10` |
Omit your domain from the record values in Resend when you paste. Instead of
`send.example.com`, paste only `send` (or `send.subdomain` if you're using a
subdomain).
Do not use the same priority for multiple records. If Priority `10` is already
in use, try a higher value `20` or `30`.
### Add TXT SPF Record
Click "Add Record" on Cloudflare:
1. Set the Type to `TXT`.
2. Type `send` for the `Name` of the record.
3. Copy the TXT Value Resend into `Content` field.
4. Use the default `Auto` for `TTL`.
5. Select `Save`.
 Below is a mapping of the record fields from Resend to Cloudflare:
| Cloudflare | Resend | Example Value |
| ---------- | ------- | ------------------------------------- |
| Type | Type | `TXT` |
| Name | Name | `send` |
| Content | Content | `"v=spf1 include:amazonses.com ~all"` |
| TTL | - | `Auto` |
Omit your domain from the record values in Resend when you paste. Instead of
`send.example.com`, paste only `send` (or `send.subdomain` if you're using a
subdomain).
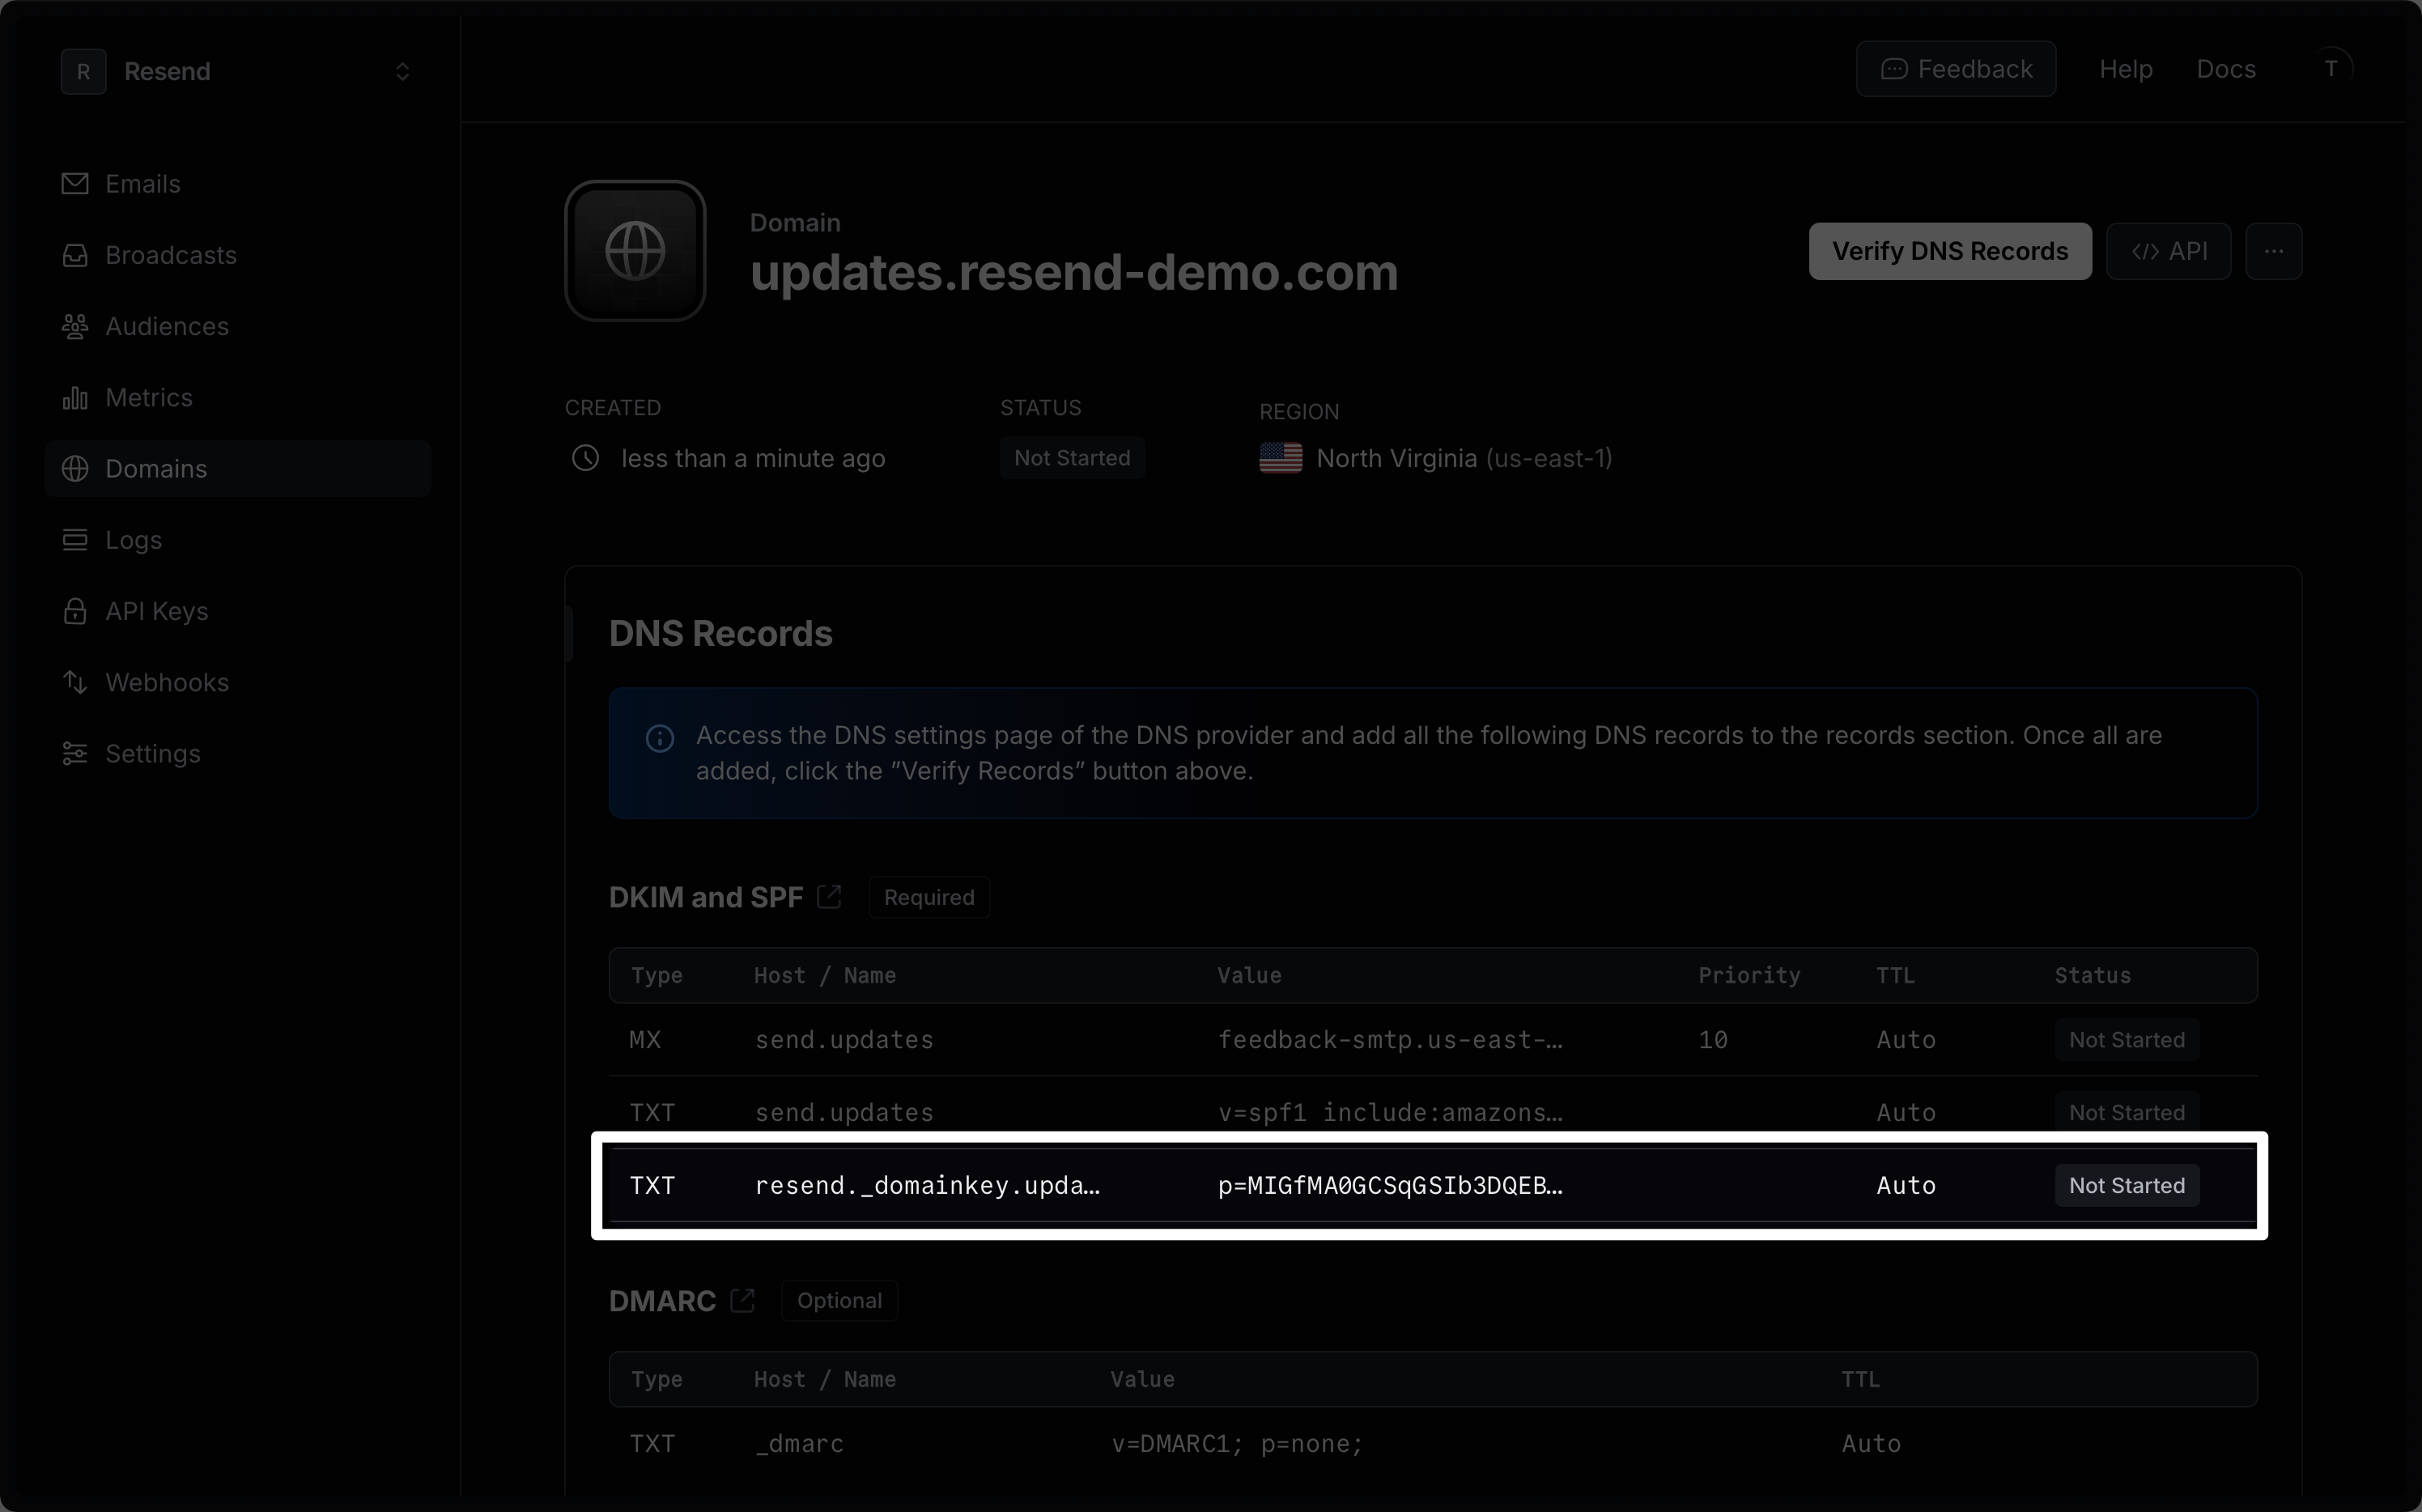
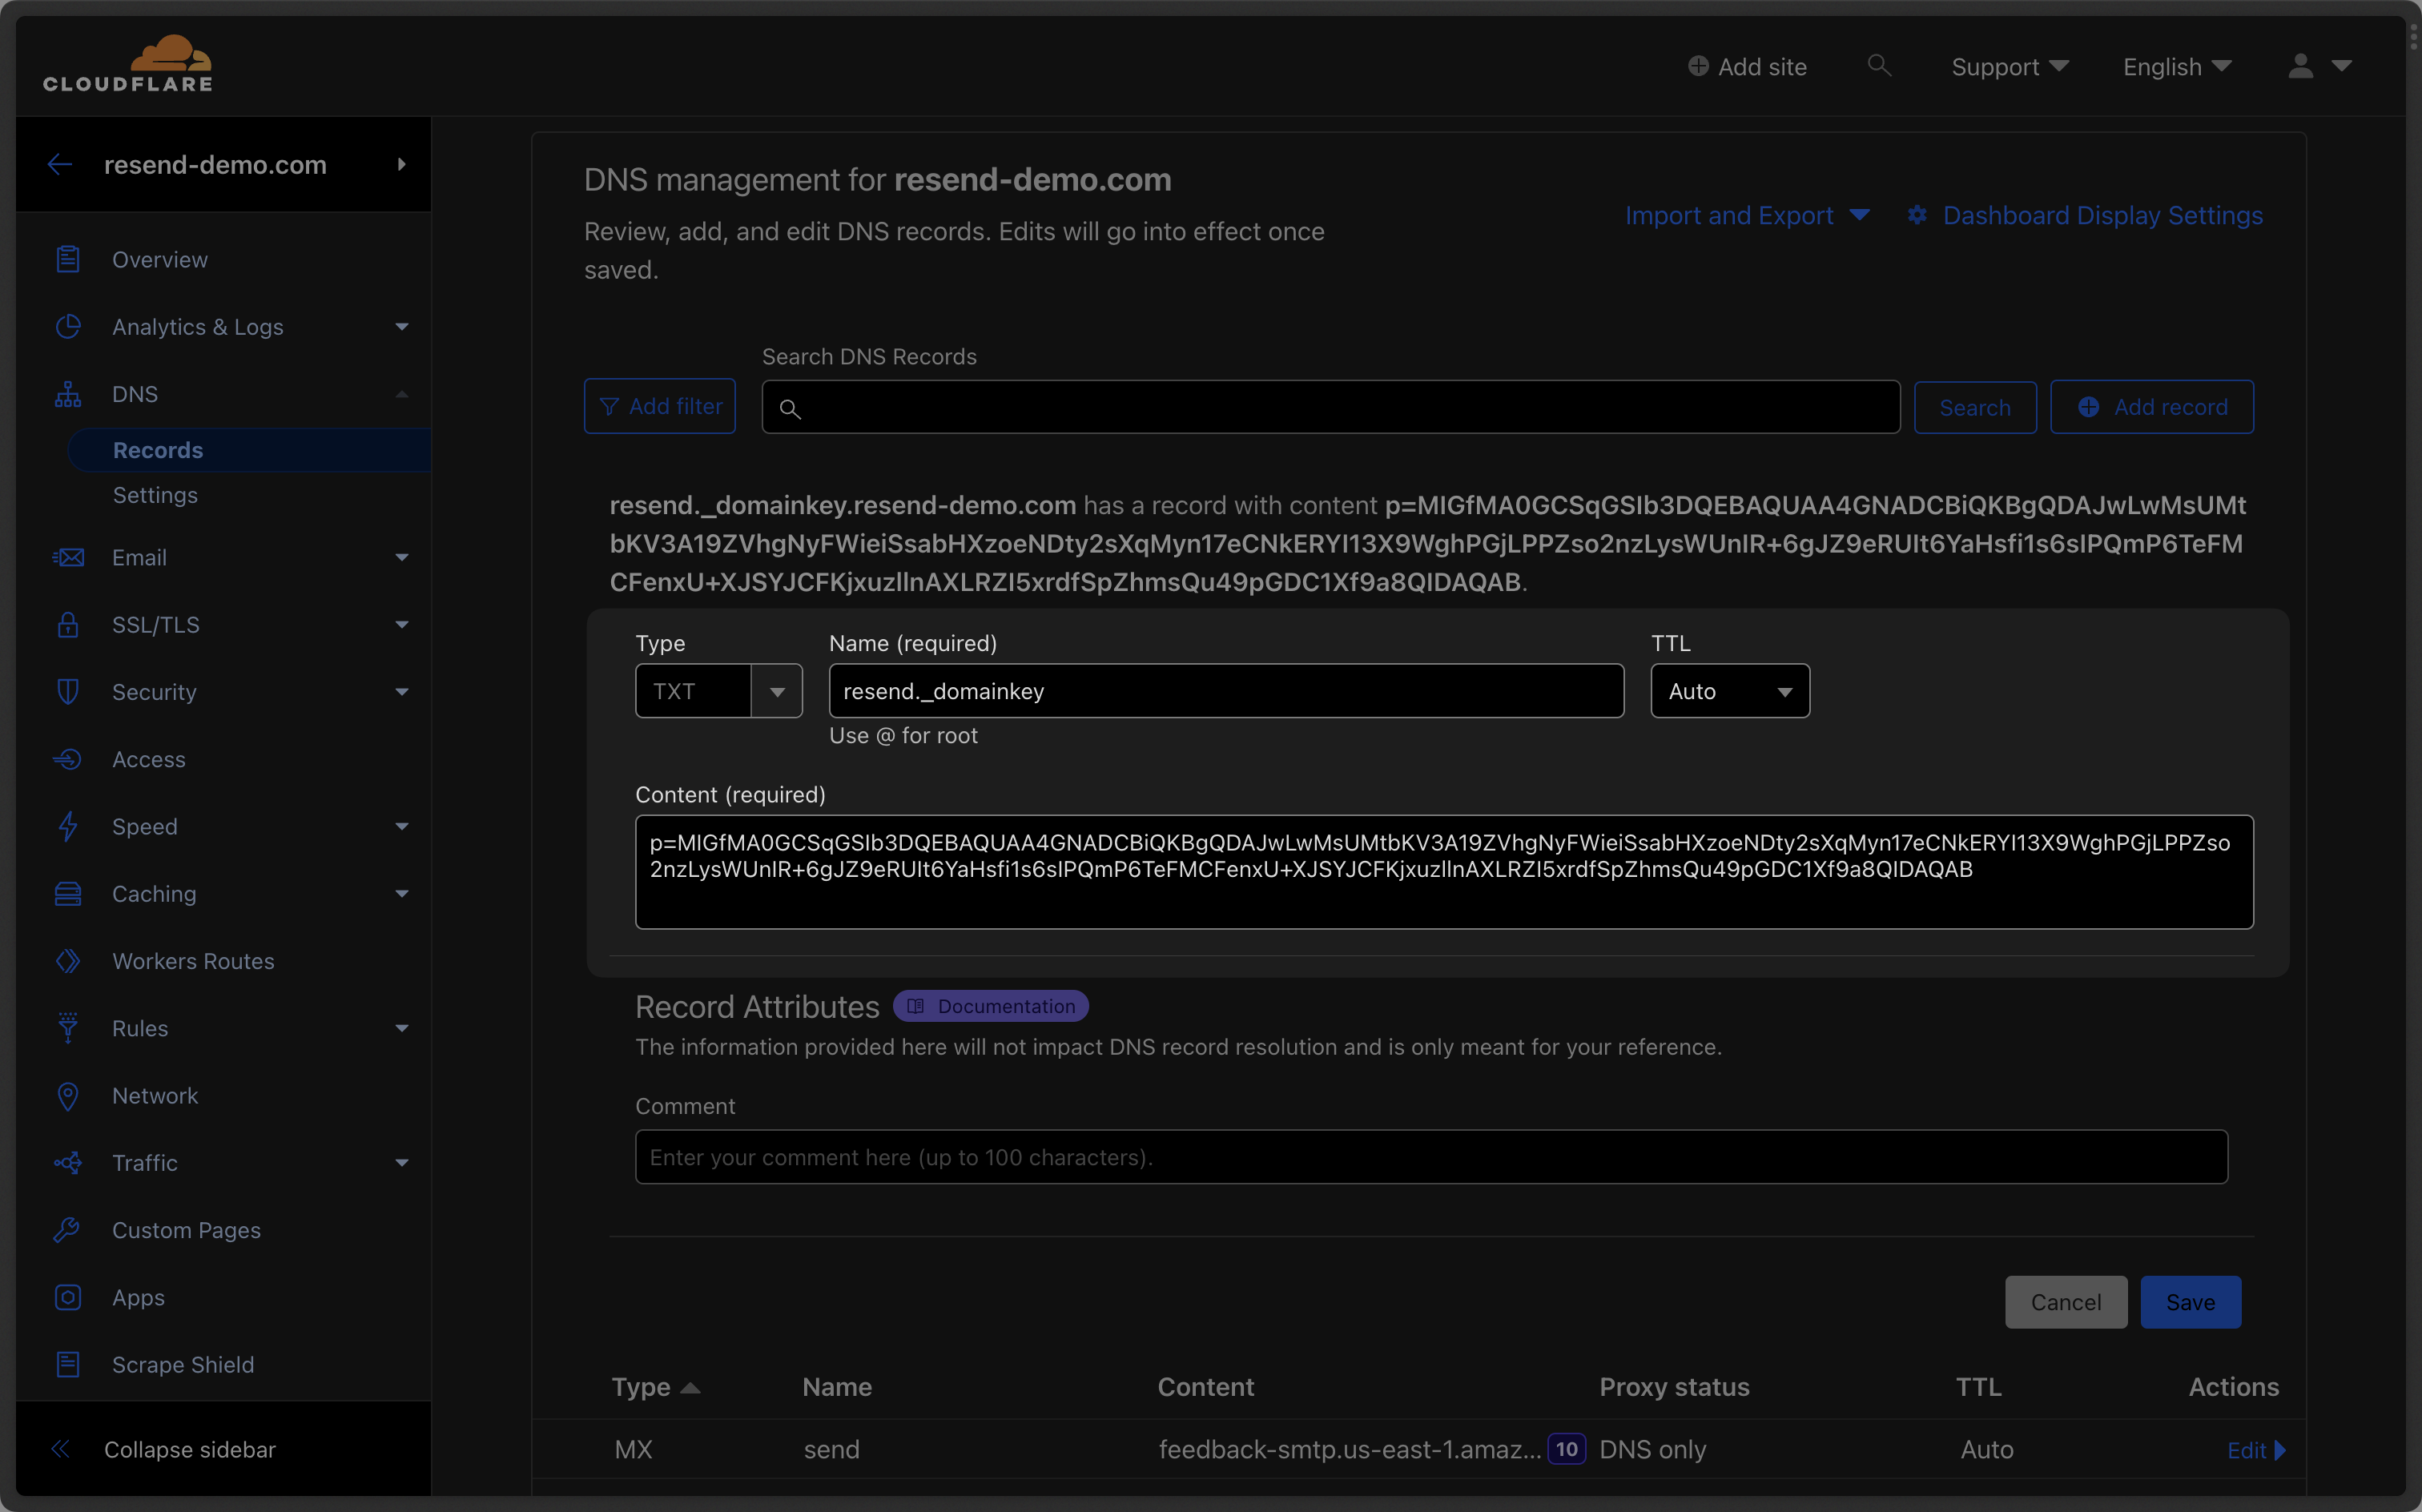
### Add TXT DKIM Records
Click "Add Record" on Cloudflare:
1. Set the Type to `TXT`.
2. Type `resend._domainkey` for the `Name` of the record.
3. Copy the TXT Value Resend into `Content` field.
4. Use the default `Auto` for `TTL`.
5. Select `Save`.
Below is a mapping of the record fields from Resend to Cloudflare:
| Cloudflare | Resend | Example Value |
| ---------- | ------- | ------------------------------------- |
| Type | Type | `TXT` |
| Name | Name | `send` |
| Content | Content | `"v=spf1 include:amazonses.com ~all"` |
| TTL | - | `Auto` |
Omit your domain from the record values in Resend when you paste. Instead of
`send.example.com`, paste only `send` (or `send.subdomain` if you're using a
subdomain).
### Add TXT DKIM Records
Click "Add Record" on Cloudflare:
1. Set the Type to `TXT`.
2. Type `resend._domainkey` for the `Name` of the record.
3. Copy the TXT Value Resend into `Content` field.
4. Use the default `Auto` for `TTL`.
5. Select `Save`.
 Below is a mapping of the record fields from Resend to Cloudflare:
| Cloudflare | Resend | Example Value |
| ------------ | ------- | ---------------------------- |
| Type | Type | `TXT` |
| Name | Name | `resend._domainkey` |
| Target | Content | `p=example_domain_key_value` |
| Proxy Status | - | `DNS Only (disabled)` |
| TTL | - | `Auto` |
Omit your domain from the record values in Resend when you paste. Instead of
`resend._domainkey.example.com`, paste only `resend._domainkey` (or
`resend._domainkey.subdomain` if you're using a subdomain).
### Receiving Emails
If you want to receive emails at your domain, toggle the "Receiving" switch on the domain details page.
Below is a mapping of the record fields from Resend to Cloudflare:
| Cloudflare | Resend | Example Value |
| ------------ | ------- | ---------------------------- |
| Type | Type | `TXT` |
| Name | Name | `resend._domainkey` |
| Target | Content | `p=example_domain_key_value` |
| Proxy Status | - | `DNS Only (disabled)` |
| TTL | - | `Auto` |
Omit your domain from the record values in Resend when you paste. Instead of
`resend._domainkey.example.com`, paste only `resend._domainkey` (or
`resend._domainkey.subdomain` if you're using a subdomain).
### Receiving Emails
If you want to receive emails at your domain, toggle the "Receiving" switch on the domain details page.
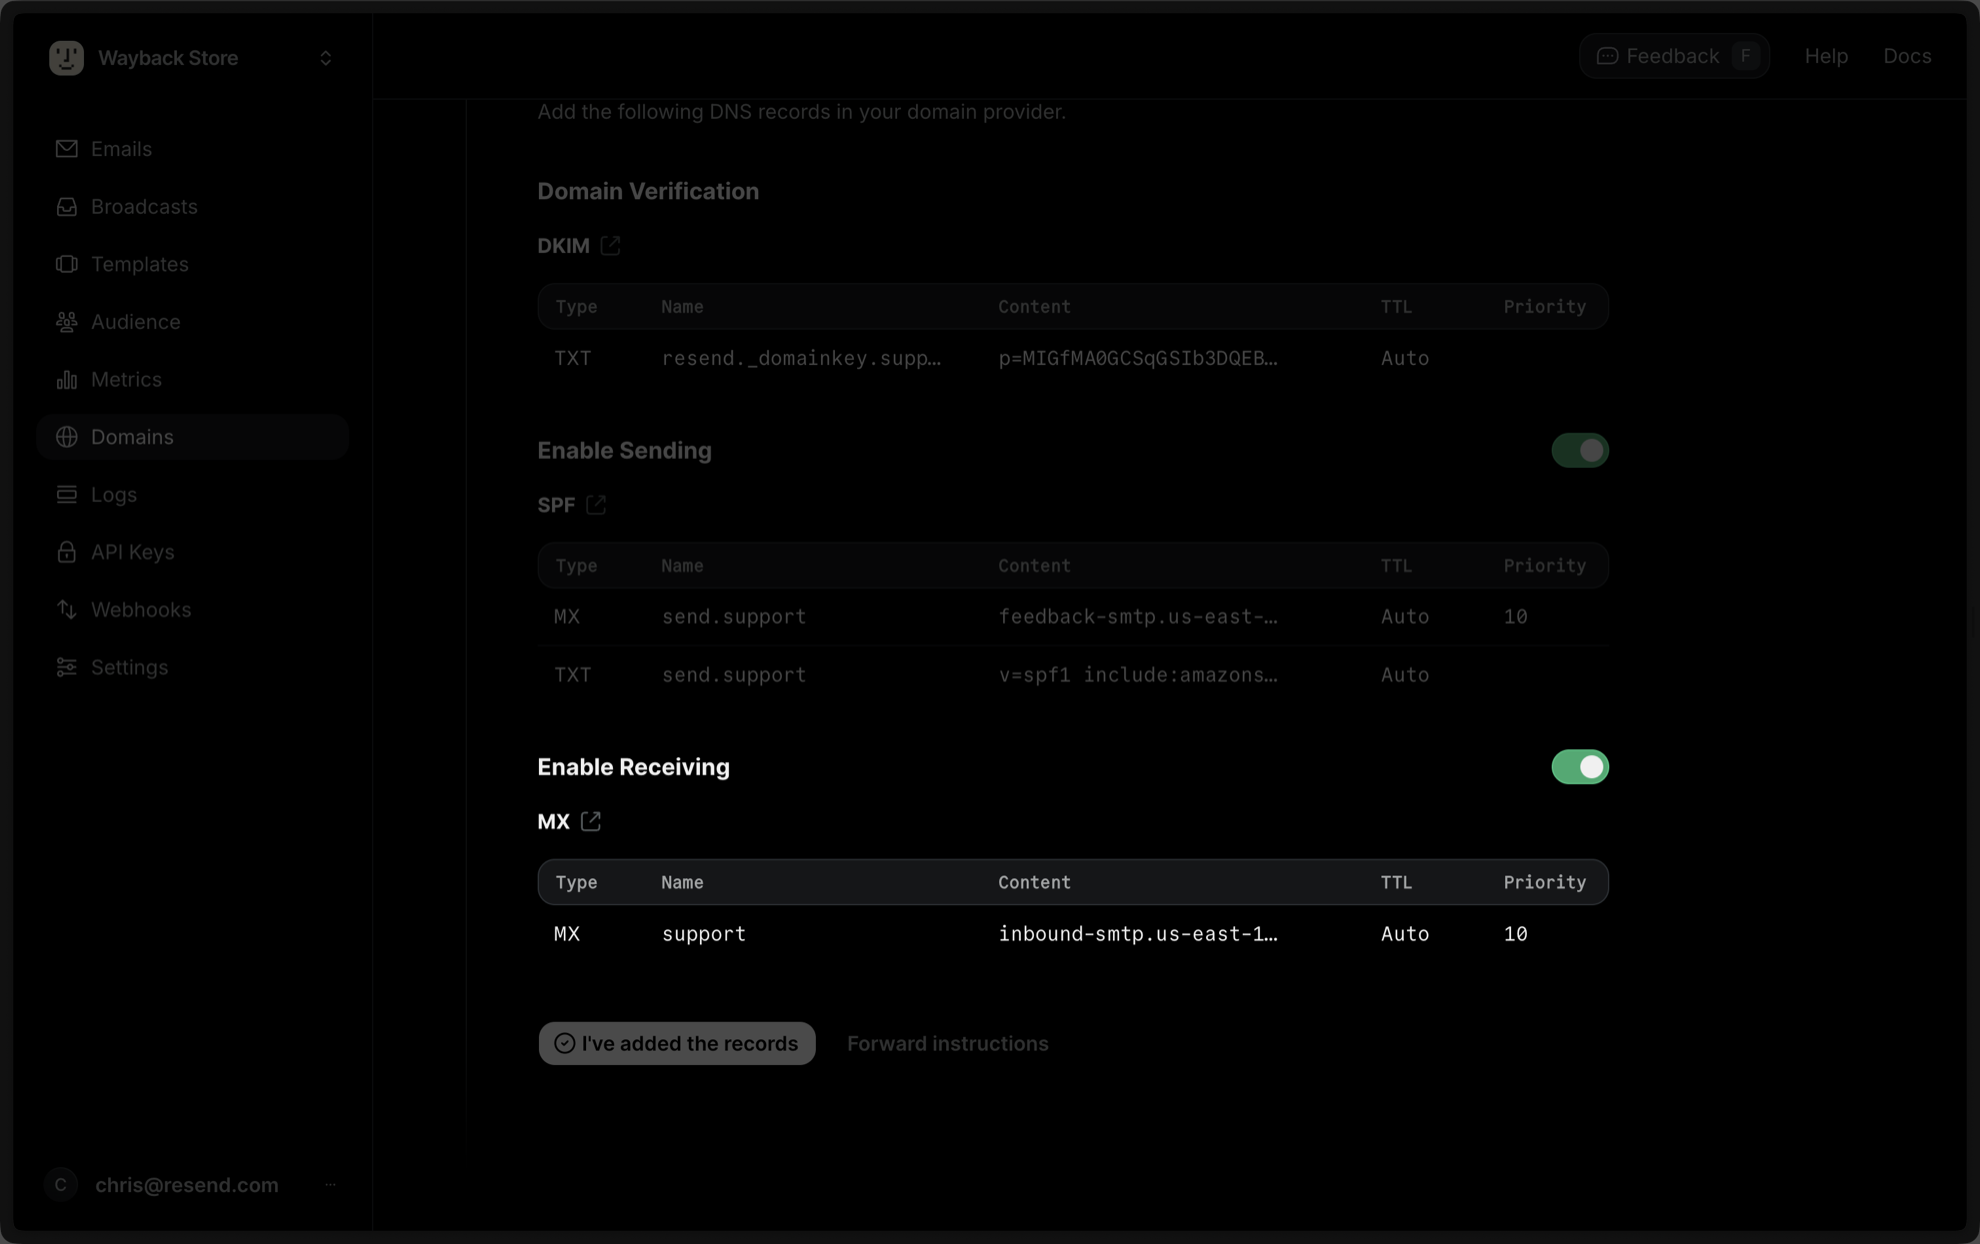 When you enable Inbound on a domain, Resend receives *all emails* sent to that
specific domain depending on the priority of the MX record. For this reason,
we strongly recommend verifying a subdomain (`subdomain.example.com`) instead
of the root domain (`example.com`). Learn more about [avoiding conflicts with
your existing MX
records](/knowledge-base/how-do-i-avoid-conflicting-with-my-mx-records).
Click “Add Record” on Cloudflare:
1. Set the Type to `MX`.
2. Type `inbound` (or whatever your subdomain is) for the `Name` of the record.
3. Copy the MX Value from Resend into the `Mail Server` field.
4. Use the default `Auto` for `TTL`.
5. Add `10` for the `Priority`.
6. Select `Save`.
Below is a mapping of the record fields from Resend to Cloudflare:
| Cloudflare | Resend | Example Value |
| ----------- | -------- | -------------------------------------- |
| Type | Type | `MX` |
| Name | Name | `inbound` |
| Mail Server | Content | `inbound-smtp.us-east-1.amazonaws.com` |
| Priority | Priority | `10` |
After verifying your domain, create a webhook to process incoming emails. For help setting up a webhook, how to access email data and attachments, forward emails, and more, see [our guide on receiving emails with Resend](/dashboard/receiving/introduction).
### Complete Verification
Now click [Verify DNS Records](https://resend.com/domains) on your Domain in Resend. It may take up to 72 hours to complete the verification process (often much faster).
## Troubleshooting
If your domain is not successfully verified, these are some common troubleshooting methods.
Confirm your proxy settings are set to `DNS Only` on the record you are adding.
Review the records you added to Cloudflare to rule out copy and paste errors.
[Review our guide on a domain not verifying](/knowledge-base/what-if-my-domain-is-not-verifying).
When you enable Inbound on a domain, Resend receives *all emails* sent to that
specific domain depending on the priority of the MX record. For this reason,
we strongly recommend verifying a subdomain (`subdomain.example.com`) instead
of the root domain (`example.com`). Learn more about [avoiding conflicts with
your existing MX
records](/knowledge-base/how-do-i-avoid-conflicting-with-my-mx-records).
Click “Add Record” on Cloudflare:
1. Set the Type to `MX`.
2. Type `inbound` (or whatever your subdomain is) for the `Name` of the record.
3. Copy the MX Value from Resend into the `Mail Server` field.
4. Use the default `Auto` for `TTL`.
5. Add `10` for the `Priority`.
6. Select `Save`.
Below is a mapping of the record fields from Resend to Cloudflare:
| Cloudflare | Resend | Example Value |
| ----------- | -------- | -------------------------------------- |
| Type | Type | `MX` |
| Name | Name | `inbound` |
| Mail Server | Content | `inbound-smtp.us-east-1.amazonaws.com` |
| Priority | Priority | `10` |
After verifying your domain, create a webhook to process incoming emails. For help setting up a webhook, how to access email data and attachments, forward emails, and more, see [our guide on receiving emails with Resend](/dashboard/receiving/introduction).
### Complete Verification
Now click [Verify DNS Records](https://resend.com/domains) on your Domain in Resend. It may take up to 72 hours to complete the verification process (often much faster).
## Troubleshooting
If your domain is not successfully verified, these are some common troubleshooting methods.
Confirm your proxy settings are set to `DNS Only` on the record you are adding.
Review the records you added to Cloudflare to rule out copy and paste errors.
[Review our guide on a domain not verifying](/knowledge-base/what-if-my-domain-is-not-verifying).